Porting in the US
Phone number porting in the U.S. refers to the process of transferring your existing phone number from one carrier to another. It allows you to keep the same number even when you change carriers. There are a few players that you should be aware of throughout the porting process:
- In the United States, NPAC stands for the Number Portability Administration Center. It is the system that facilitates Local Number Portability (LNP)—which allows phone numbers to be retained by users when they switch carriers.
- Donor provider: The carrier that currently owns the number and will lose it once the porting is completed (the user’s current provider).
- Recipient provider: The carrier that will receive the number once the porting is completed (managed through Gigs).
In the US, ports are handled directly between the donor and recipient provider, there is no central clearinghouse. Ports typically take minutes to hours to complete, with median times for successful portings being less than 60 minutes. Porting is the most complex part of the purchase flow from both a development and UX perspective, and also requires action from the end user. At the same time, it is the key point in the user journey: the ability to keep their phone number is a major driver of conversion and the ultimate signal of long-term retention. The success of your program hence hinges on its correct implementation.
Contents:
- Porting lifecycle, including End User Flow
- Information Required for a Port
- Implementation Options
- Timing considerations
- Handling Porting Declines
- How to test portings
- End user communications
Porting Lifecycle
End User Flow
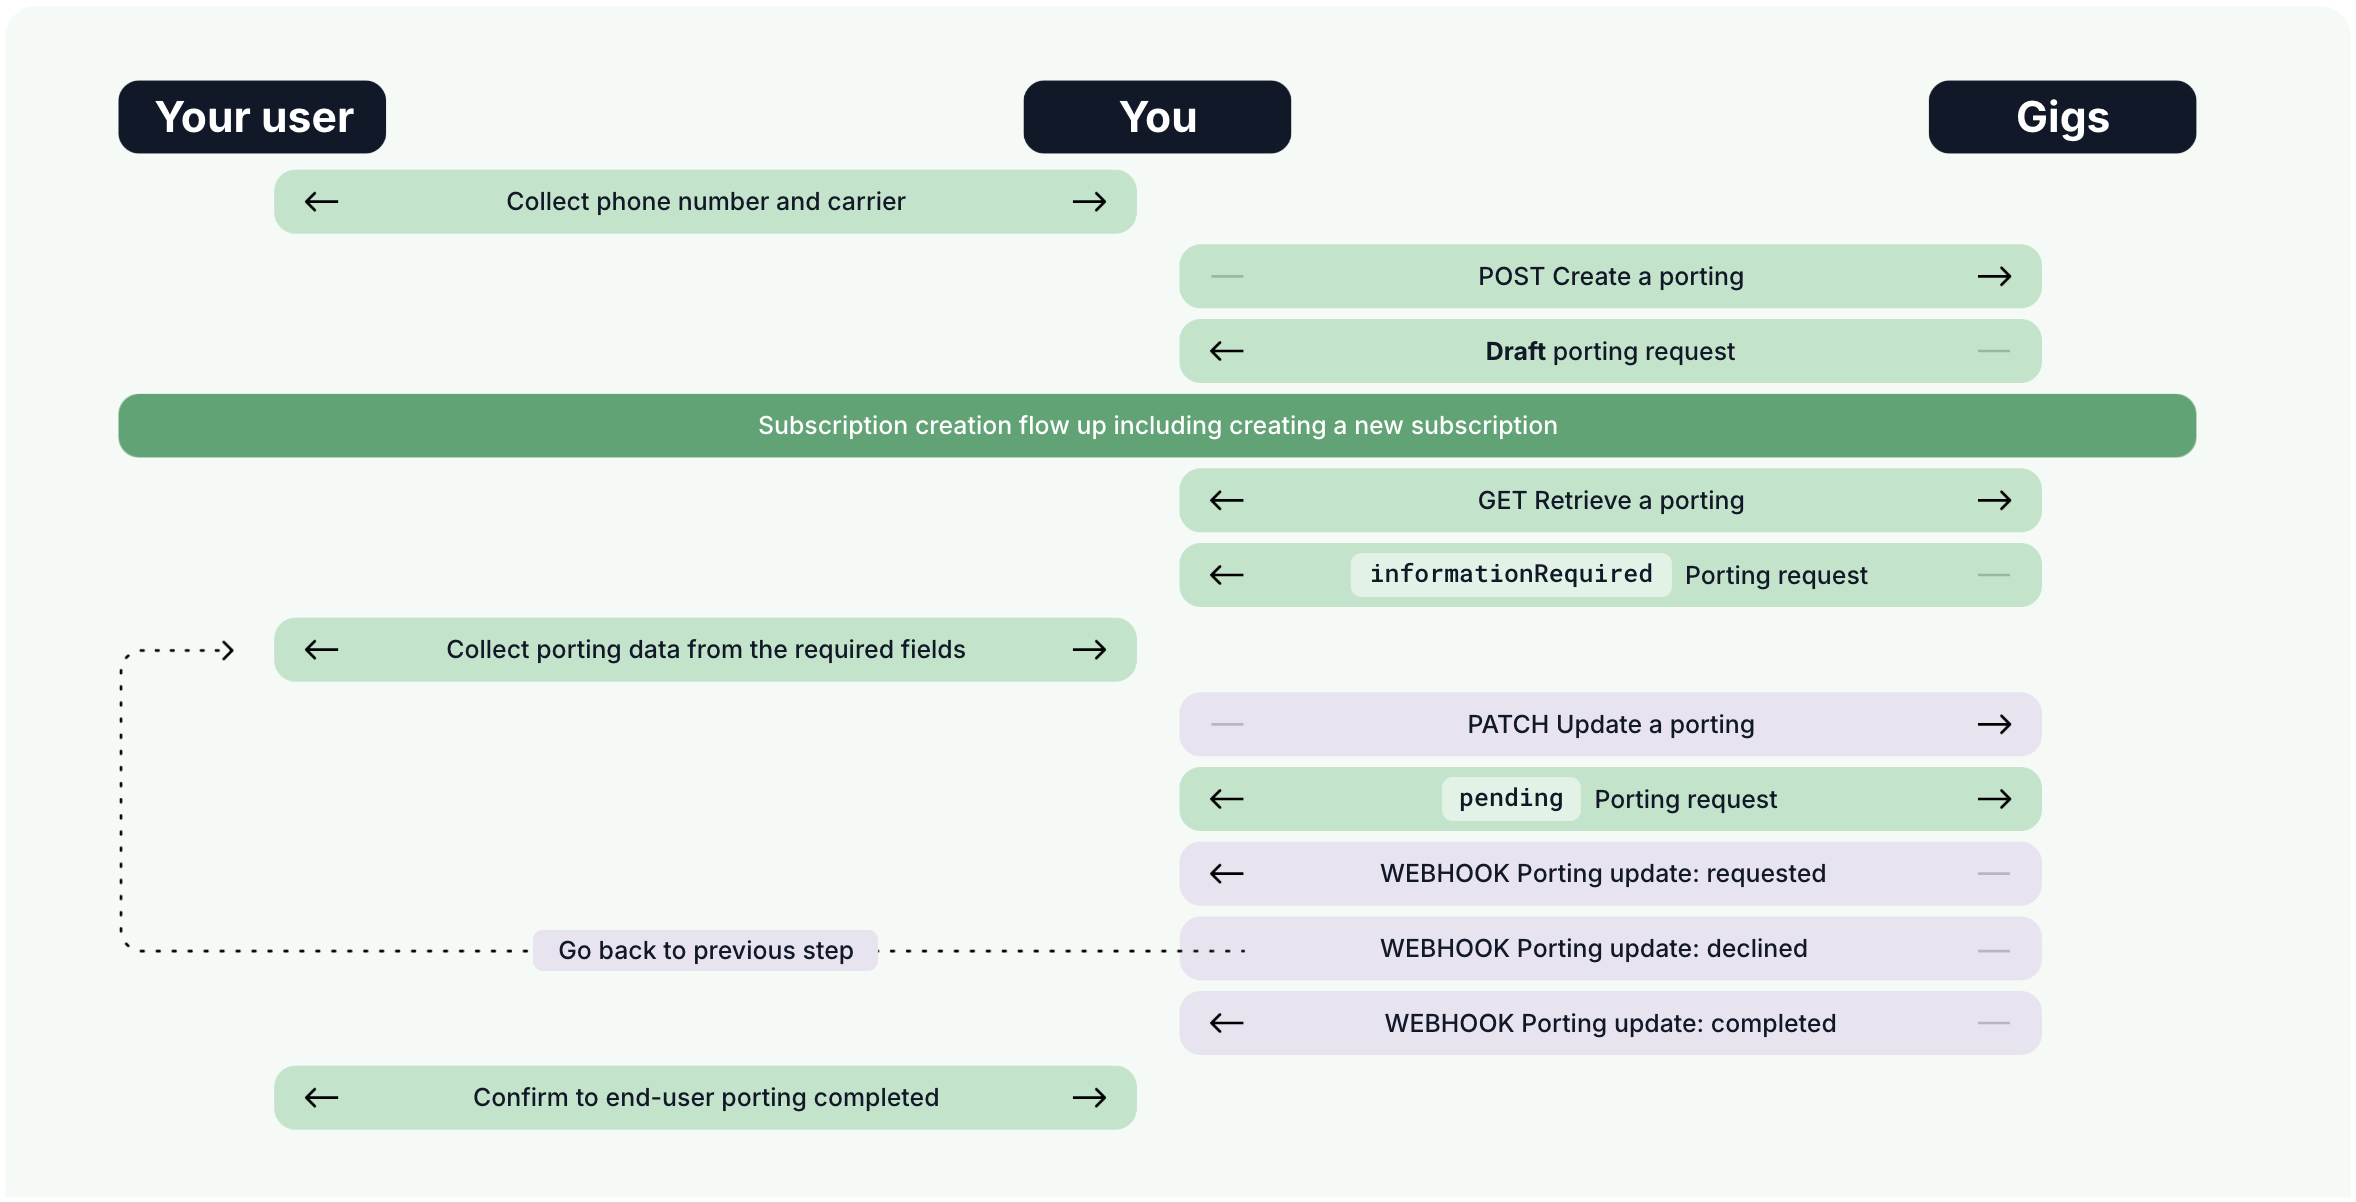
Below is an overview of the porting process:
- User indicates that they want to bring their phone number to their new phone plan
- You create a draft porting and create a subscription through the API.
- User reaches out to their current provider to obtain required porting information, which typically includes an account number and PIN.
- User inputs all required information for the port to you (see section Information Required for a Port).
- You update the porting through the API.
- Gigs submits the port to the donor provider.
- The donor provider approves the port and releases the phone number.
- The
statusof the porting moves tocompleted(see section Lifecycle) and Gigs activates the new subscription with the ported phone number. - The user cancels their subscription with their donor provider.
Lifecycle of the porting object
The porting process is modeled on the Gigs APIs through the porting object. For a detailed description of the porting object and its lifecycle, refer to the Porting Lifecycle section in How Porting in Works.
On the duration of the porting process:
The porting process in the US can be completed within minutes, when all information is provided accurately by the user. When incorrect information is provided, a back-and-forth between your user and their carrier may occur, which can draw out the process. See the Information Required for a Port section for a list of all information that is needed from your user.
Expiration timelines for ports vary between carriers in the US, ranging between 10 and 50 days. When a port has expired, you need to create a new porting object and a new subscription.
Information Required for a Port
Below is the information that is required to submit a port. Note that it is crucial that every piece of this information is correct and exactly matches what the donor carrier has on file.
The exact attributes required for a porting are listed in the required attribute of the porting object.
We strongly recommend emphasizing in the UI/UX (for instance with mandatory checkboxes) the importance of the user checking that the porting information matches what they have on file with their donor provider as any mismatches will result in delays.
- Phone number: Number that the user wants to bring to their new subscription
- Account holder name: Name of the account holder for the user’s current carrier. The account holder is the owner of the account
- User address: This is the address on file with the user’s current carrier
- Account number: User must obtain this from their current carrier
- Account PIN: User must obtain this from their current carrier
- Donor provider: User’s current carrier
- Recipient provider:
p11orp13
In specific cases, we might also require:
- Billing PIN: Additional security code linked to the user's current account (currently relevant only for p11)
Implementation Options
There are two options when it comes to implementing porting: building a custom porting flow using the Gigs API, or leveraging the low-code Gigs’ Connect Sessions completePorting Intent (recommended for most customers).
API
Using the API is an option for those that want the design to be native in their app. See below for what is required to successfully build out a porting flow:
API Endpoints to Use:
- Create a draft porting
- List all service providers (when calling this endpoint filter for US only providers)
- Create a subscription
- Update the porting (to complete the porting with newly provided information by the user)
- Cancel a porting (if needed)
How to handle decline codes or ineligible ports:
Appropriately handle any decline codes that come back from a submitted port. Please see the section on Handling Porting Declines on how to handle declined ports, and End-User Communications for how to keep your end user informed about the status and required action on their side.
Additional Information to Note:
We recommend to surface instructions for how to retrieve the necessary credentials (account number and PIN) from key donor providers and embed them in your application.
If a user's service provider does not appear in the returned list of service providers, an option labeled "Other (unlisted provider)" is available in the response and can be used for such cases.
For additional information on how to implement the Porting API, refer to the section How Porting In Works.
Connect Sessions completePorting Intent
The completePorting Intent consists a fully templated porting experience, hosted by Gigs. You can show the completePorting event in a webview in your application. With the Gigs completePorting Intent the most common decline codes, the donor carrier list, and donor specific port out instructions are handled automatically and kept up to date by Gigs.
We recommend the majority of customers to use the Connect Sessions completePorting Intent.
After creating a subscription, redirect the user to the Connect Session to provide the initial porting information. The Connection Session will show the required input fields and details about the donor provider. Additionally, you can redirect to a Connect Session again when the initial attempt is not successful and follow-up actions are required.
API Endpoints To Use:
- Create a draft porting
- List all service providers (when calling this endpoint filter for US only providers)
- Create a subscription
- Create a Connect Session with Intent: completePorting and redirect the user to the Connect Sessions URL.
Additional Information to Note:
The completePorting intent handles the most common decline codes automatically:
portingAccountNumberRequiredOrInvalidportingAccountPinRequiredOrInvalidportingAddressRequiredOrInvalidportingPhoneNumberPortProtected
If a user's service provider does not appear in the returned list of service providers, an option labeled "Other (unlisted provider)" is available in the response and can be used for such cases.
If a Connect Session is created with a non-applicable declinedCode, Connect will immediately redirect the user back to the callbackUrl with the bad_configuration status code. If no callbackUrl is provided, Connect will display an error screen.
We recommend redirecting users to a Gigs Connect Session with completePorting Intent by default when portings are not successful. For the following statuses, the user cannot successfully complete their port and should be given the option to create their subscription with a new number. If you decide to build out a flow for these statuses you do not need to send the user to the Connect Sessions intent:
portingDeclinedportingPhoneNumberNotActiveportingPhoneNumberAdministrative
To create consistency in styling between your application and the Connect Session completePorting intent, the button colors and logo are customizable.
For a more complete reference of the completePorting intent, please refer to Intent: completePorting in the Connect sessions documentation.
Timing considerations
When should you collect information from the end user?
It is possible to collect all porting information from the end user before completing the payment. To optimize for conversion however, we recommend collecting a limited set of information before completing the payment:
| User information to collect before payment | User information to collect after payment |
|---|---|
| Phone number: Number that the user wants to bring to their new subscription | Account holder name: Name of the account holder for the user’s current carrier |
| User address: This is the address associated with the user’s current carrier. Note that you can pull the address that you have on file for the user to populate this field, however it may not be the correct address associated with the user’s current carrier. | Account number: User must obtain this from their current carrier |
| Donor provider: User’s current carrier | Account PIN: User must obtain this from their current carrier |
The user will have to manually reach out to their current carrier to collect their account number and PIN and come back to your application to input the information. Therefore if they have already paid for the subscription, they are more likely to follow through with providing their porting information.
When should the user be charged for the subscription?
| Pros | Cons | |
|---|---|---|
| Before they are prompted to enter their account number and PIN. You could take the payment or authorize (hold) the funds. (recommended) | This ensures a higher likelihood that the user will follow through to complete the port since they have already committed money to the new subscription. | If the port cannot be completed, the payment will require a refund or cancellation. |
| The user can pay for their subscription after the port has successfully completed. | The user will not be paying for the new subscription for a period of time where they do not have connectivity. | There is less incentive for the user to follow through with their purchase. |
When should the user be prompted to download their eSIM?
| Pros | Cons | |
|---|---|---|
| Once the port has been successfully processed and is complete (recommended) | Least confusing flow for the end user. It also ensures that the end user switfly resolves any issues that may arise during the porting process. | The user needs to be connected to Wifi to download their eSIM and might experience a period of no service if they are not. |
| Right after submission of the port info, and before the port is complete | The user will not have any connectivity downtime, as their eSIM will automatically start working once the port is complete. | It may cause confusion and loss of connectivity, as the user may try to use this SIM before it is active and deactivate their old SIM. |
Handling Porting Declines
Porting Decline Codes
The Gigs platform abstracts country and provider specific porting decline codes to a generic set of codes to use in your integration. For detailed instructions on the available declines codes, refer to the Decline Codes section in How Porting in Works.
Due to inherent limitations of phone number porting infrastructure, decline codes are surfaced one at a time. Therefore if a port has multiple declines, the next decline reason will not appear until the first decline reason is resolved.
How to Test Portings
The test providers that are part of the Gigs platform allow for extensive testing of Porting. Test phone numbers are used to simulate different porting scenarios and verify that your integration with the Gigs API works correctly.
For test phone numbers, refer to the Testing section in the Core documentation.
End-User Communication
Porting lifecycle communication: Status and Decline Codes
Based on the status and the decline code of the port, you should send specific communication with a Call-to-Action to the end user. This ensures your users know when to take which action, helping to expedite the porting process and reduce the need for customer support intervention.
We recommend communication for the following stages of the porting lifecycle:
- Porting requested
- Porting status is
informationRequiredfor 1 day - Porting status is
informationRequiredfor 2 days - Porting status is
informationRequiredfor 3 days - Porting status is
informationRequiredfor 6 days - Porting status is
informationRequiredfor 8 days - Porting status is
informationRequiredfor 12 days - Porting status is
declinedfor 1 day - Porting status is
declinedfor 2 days - Porting status is
declinedfor 4 days - Porting status is
declinedfor 6 days - Porting completed
We are happy to provide templated communication for the different steps in the porting lifecycle through your primary Gigs contact or support@gigs.com.
Using Gigs webhooks to send porting lifecycle communication
We proactively inform you of all status changes of a porting through our webhooks, so you can trigger communication to your end user. You can configure a webhook endpoint in the developers section of the Gigs Dashboard. Once there, you can add an endpoint and set the URL where the requests should be sent to. You can also select which events you'd like to receive on this endpoint.
Detailed information about how to setup webhooks can be found in our documentation on Events and Webhooks.
The following event types are relevant for number porting: